


The instructions below describe how to install DIABASS6 PRO on a workstation or in a network.
More info

Click here to download DIABASS®

Tip: You have received the licence key by email. You can use the key combination STRG+A to highlight the text of this e-mail, copy it to the clipboard using STRG+C and then paste it into the licence entry field using STRG+V.
Click here for instructions on how to enter the licence key
To do this, click on the SETTINGS button in DIABASS®.
Further information on this can be obtained from the respective manufacturers or can be found in this info sheet.
Click here to download a driver package for most common cables.
Click here for more information on installing on a terminal server.
Click here for more information on the installation/distribution of updates.
More info
1. Download DIABASS® software
Click here to download DIABASS®
2. Install DIABASS®
Tip: You have received the licence key by email. You can use the key combination STRG+A to highlight the text of this e-mail, copy it to the clipboard using STRG+C and then paste it into the licence entry field using STRG+V.
Click here for instructions on how to enter the licence key
3. Setting up the software
Now set the configuration you want for your practice, for example, the unit of measurement for blood glucose, the colours or the thresholds to be used by default for patients.To do this, click on the SETTINGS button in DIABASS®.
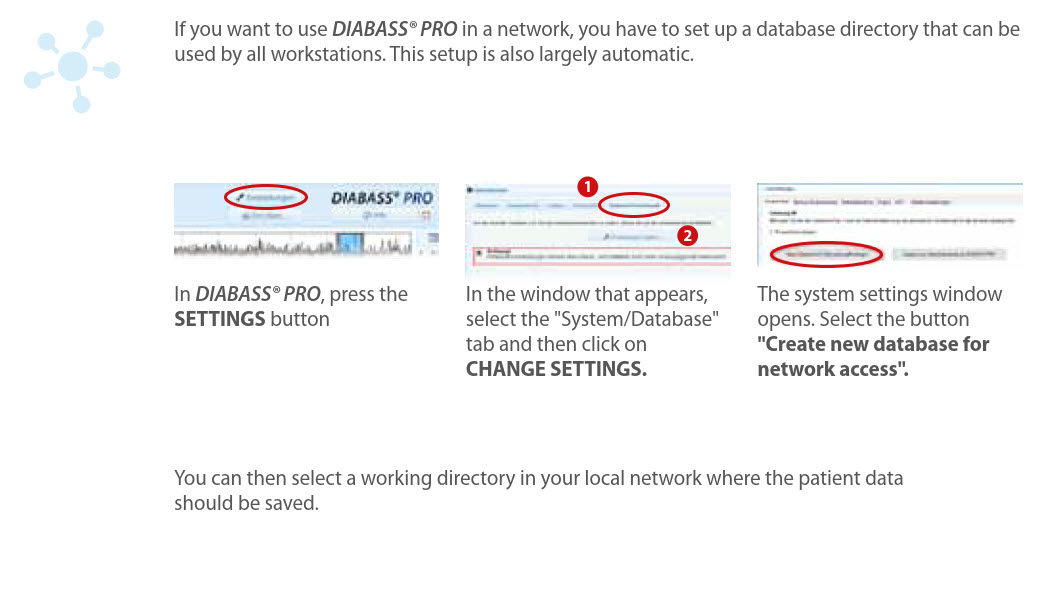
4. Set up shared folder on the network
5. Set up on additional workstations
To install on additional workstations in the network, proceed as follows:- Go to the workstation where you want to install
- Switch to the DIABASS® directory on the server drive created under 4. and open the subfolder "setup" therein, for example y:\daten\diabass\setup.
- Run the file install.bat located in this folder
Now DIABASS® PRO will be set up on the workstation in a few seconds; the configuration will be taken over automatically.
Repeat this on all further workstations where DIABASS® PRO shall be used.
6. Install cable driver
In order for data transmission from measuring devices to work, the respective cable must be set up on the PC ready for operation.Further information on this can be obtained from the respective manufacturers or can be found in this info sheet.
Click here to download a driver package for most common cables.
7. Installation on terminal server
The installation of DIABASS6 PRO basically requires a full-fledged PC with Windows. If no full-fledged workstations are available or only terminal operation (e.g. Citrix) is possible, DIABASS can also be installed on a terminal server.Click here for more information on installing on a terminal server.
8. Updates
DIABASS has an (optional) automatic update check. As an alternative, updates could be rolled out on a local folder. Packaging is asily possible, too.Click here for more information on the installation/distribution of updates.